
Installation & specifications
Rigid. Safe. Easy to use.
Hydrawood lining products suit renovations and new builds alike — installed with or without trims, direct to framing or over existing wall linings, butt joined and sealed. Here's the full method, plus the two documents your consent file needs.
The method
Six steps. One trade. No wet work.
- 1
Set out the framing
Check stud centres against your sheet width — 600mm max for 1200mm sheets, 450mm max for 900mm sheets — and confirm surfaces are straight, flush and dry (below 18% moisture).
- 2
Clean the surfaces
Clean framing and panel contact surfaces with a solvent cleaner before fixing so the adhesive bonds to sound material.
- 3
Apply the adhesive
Run continuous 5mm × 5mm adhesive beads along the framing using a recommended construction adhesive.
- 4
Place and press the sheet
Position the sheet into the jointer, then press firmly onto the adhesive so the adhesive beads wet out across the framing.
- 5
Joint and seal
Fit the aluminium and or Flushfit jointers — ( in wet areas silicone-seal so no water can reach the framing. ) Joints and penetrations must stay sealed for the life of the wall.
- 6
Let it cure
Allow 24 hours cure time before further work. No grouting, plastering or painting follows — the wall is finished.
Scope
Where it can be fixed
Panels install over timber framing, steel construction and existing substrates. Support surfaces must be straight, flush, and below 18% moisture content.
- Timber framing
- Studs at maximum 600mm centres for 1200mm-wide sheets; 450mm maximum centres for 900mm-wide sheets. Ceiling battens at minimum 400mm spacing.
- Steel construction
- Fix to steel framing using the same set-out rules as timber.
- Existing linings
- Install directly over sound existing wall linings such as plasterboard.
- Concrete, masonry & brick
- Fix to battens spaced at 600mm centres horizontally and vertically (adjusted for panel width). All timber requires damp-proof courses between concrete surfaces.
Junctions
The jointer system
Five aluminium jointer profiles cover every junction for 7.6mm lining panels — with FlushFit and PVC jointer options also available.
- End cap
- Standard H jointer
- Flushfit jointer
- Internal corner
- External corner
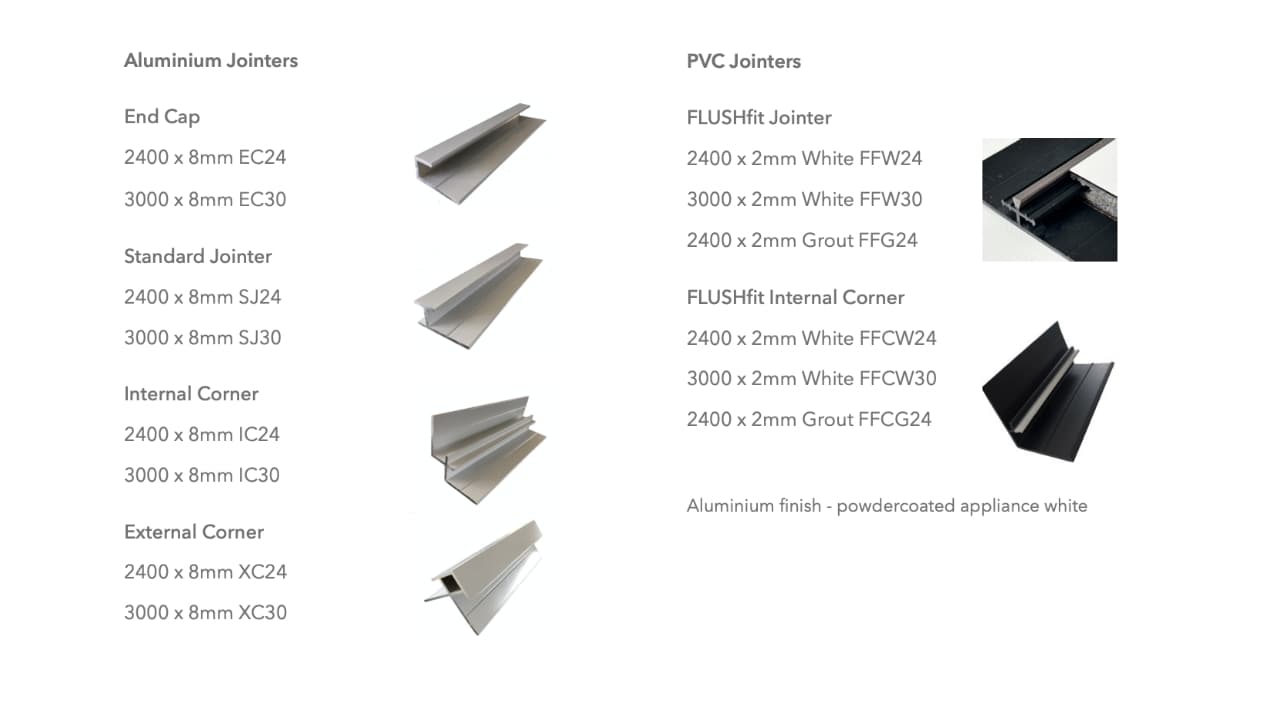
Hydrapanel can also be installed in dry areas with the flushfit Negative jointer.
Fixing
Recommended adhesives
Fix with one of the tested construction adhesives:
- Selleys 650FC (formerly Armourflex FC)
- Gorilla Fix All High Tack
- Würth PUR Construction Adhesive Rapid
Three ways to finish the joints
- Aluminium jointers
- Continuous adhesive beads with the standard 8mm aluminium jointer system at sheet junctions. (PVC white H jointers also available.)
- Flushfit PVC jointers
- Continuous adhesive beads with the Flushfit 8mm PVC jointer system at sheet junctions.
- Flushfit Negative PVC jointers
- Continuous adhesive beads with the Flushfit Negative 8mm PVC jointer system at sheet junctions. (Joints can be silicone sealed as required.)
All methods require 24-hour cure time before additional work.
For your consent file
Take the documents with you
Everything above — plus junction details, performance data, and care & maintenance — lives in the full guide. The PASS statement is the consenting document for your file.
Hydrapanel Specification & Installation Guide
The complete design and installation reference: performance, use, design, installation, junction details, and care & maintenance.
DownloadHydrapanel Lining Panel PASS v1.6
Product Assurance Supplier Statement (exp. 06/2026) — the widely-recognised consenting tool demonstrating Building Code compliance.
DownloadQuestions the documents don't answer? Talk to us or ask your Bunnings Trade rep.